|
Alaska Trekking Home | About Us | Trips | Food | Gear | Packrafts | Pebble Mine | Ground Truth Trekking
|
Gear
| 
|

Route Map
Latest Expedition!
We've completed our year-long expedition from Seattle to the Aleutian Islands,
exploring environmental issues along the way.
Four thousand miles along the edge of the
Pacific, by foot, raft, and skis. June 2007 - June 2008.
Check out the latest on our blog!
Read about the Expedition Gear!
We brought our gear through 12.5 months of abuse, including heavy bushwhacking, incessant rain, persistant high winds, blowing snow, -30F cold, and the teeth and claws of a large grizzly bear.
See the expedition gear page, and the trip blog at Ground Truth Trekking, for more.
Our gear list has changed a lot over time as we've tried to minimize weight and volume, while maximizing safety and comfort. We make a lot of our own gear, and are always tinkering with both the gear list and gear designs. I've tried to discuss failed ideas as well as successful ones and the rationale for everything we bring. Hopefully the discussion here will help in thinking about your own gear.
This gear list has been developed for use in long-distance hiking and packrafting expeditions over rugged terrain, generally in Alaska, and mostly in the summer (with the exception of our Winter on the Pacific Coast trip.)
See my friend's site Beyond Spec for more reviews and discussion of gear.
Look here for a table with itemized gear weights, or see a list of gear with a discussion of each item (and links to some manufacturers) below.
|
|
|
|
Pack:
-
Backpack
A good pack should be light, simple, durable, big enough to hold two weeks worth of stuff and food, small enough to allow me to crawl under logs and through branches, and comfortable. It also shouldn't have dangly bits that catch on branches, and it's preferrable if it doesn't absorb too much water (wet packs are heavy). I prefer frameless packs. With correct packing, they can be as comfortable as frame packs, and much lighter and sleeker.
I used to use an old canvas day/overnight backpack. This eventually died. Next we got GoLite Gust packs (1lb 4oz), and have been fairly happy with them. The top closure strap is longer than necessary, and you have to tuck in the drawstring if you want it not to tangle. I also added a chest strap to mine (which also serves to hold bear spray). For weights up to 30lbs or so, I find that a fanny pack can support the pack and serve as a hip belt, but for larger loads, a hip belt is a good idea. Hig learned this the hard way when he cut his off. Like most packs I've owned, the bottom shredded out after a couple years, so I patched it with heavier canvas fabric.
With a frameless pack like the Gust, it's important how you pack it. I like to take my thermarest, fold it in thirds, and place it right against the back of the pack with valve open. Then I take the two pieces of my paddle shafts, and put them down the back corners, to act as struts. This (especially the thermarest), gives the pack much more structure and support.
Since Hig's Gust died, he's been experimenting with a homemade mesh pack (14 oz). Jury's still out on how well this will work.
-
Fanny pack
I carry all my emergency gear in a fanny pack. The fanny pack supports the pack and acts as a kind of hip belt, but the main point is that if I am ever separated from my pack, I still have all the emergency gear. Hig does the same thing with a homemade drybag he slings over his shoulder. Pretty much any fanny pack will serve this purpose for awhile, but the fanny pack suffers a lot of abuse, and the more heavy-duty ones will last longer.
| |
|
|
Clothing:
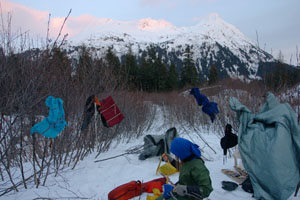
Raingear
Raingear is our most basic hiking clothing, and we wear full raingear in almost all weather conditions we find in Alaska. It's relatively light, absorbs no water, and is good protection from water, wind, bugs, and brush. We find it quite comfortable even with nothing on underneath it.
However, raingear, particularly the pants, gets totally shredded with this type of hiking use. Super light super cheap (stow in it's own pocket-type) raingear is not worth buying if you're going to be doing any sort of bushwhacking. It will last days, at most.
Triple-ply breathable gortex made with ripstop nylon is the best fabric we've found. It won't stay waterproof forever, but it is very light, doesn't shred as much as non-ripstop, and breathability is key if you wear it all the time. Some of the newer soft-shell fabrics may be even better, but we haven't got our hands on this stuff yet.
However, most commercial goretex clothing is both expensive, heavy (has too many bells and whistles), and not really all that tough. We've gone to buying triple-ply ripstop goretex from Seattle Fabrics and making our own raingear. It ends up quite a bit lighter this way: about 14 oz for a full pants and coat setup or one-piece suit (we have a continuing debate over which format is better)
One of the things we've found in making raingear is that cuffs are bad. Cuffs and hems both, but particularly those elasticized cuffs you find at wrists and ankles. They add some weight when dry, but when they get wet, they soak up water and add a whole lot more weight. And they take forever to dry. We just cut the goretex and leave it. Seems to hold up fine. Insulation
Aside from raingear, the only clothing we bring are fleece garments of our own design (about 1lb 7oz, depending on size).
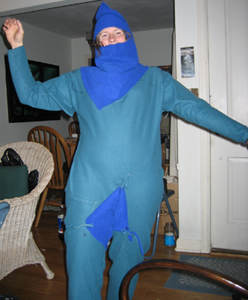
The basic garment is a one-piece bodysuit (to eliminate gaps or overlap where a shirt meets pants), with an attached hood, and no crotch (for answering calls of nature without taking the whole thing off). We have fleece shorts we wear over it (picture shows and older version). For winter trips, we'll add a second fleece "hoodie", which is basically a hooded fleece T-shirt with an extra flap of insulation that can be closed over the crotch.
Fleece insulates well even when soaking wet (which it will get eventually, especially rafting), and drains water well. 200 or 300 weight fleece is better than 100 weight fleece, which doesn't drain as well.
Many hikers use polypro long underwear as an underlayer. We used to bring polypro, but found that its wicking properties were actually a disadvantage when the water was coming from outside (such as on a wet bushwhack, or a spill into a river). Shoes
We've found trail-running shoes to be the best type for our purposes. I look for ones that are light, with a reinforced toe, and with mesh holes to drain water. Personally, I love the Montrail Vitesse shoes, and am on my fifth pair of them (one good pair of light shoes lasts about 1 summer of solid hiking).
We don't do anything to keep our feet dry, but rather rely on the shoes to drain water well, and a pair of dry socks to dry our feet out at night. Some people prefer to cross rivers in crossing shoes or bare feet, rather than get their boots wet. However, an extra pair of shoes is heavy, and crossing a tricky and icy-cold glacial river in bare feet can be dangerous as well as unpleasant.
If you have particularly bad ankles, light hiking shoes may not be enough support. My mother finds that hiking with rigid ankle braces in addition to the shoes works well for her.
Socks
We've tried various sorts of waterproof socks, which do keep the feet warmer in river crossings, but also shred quickly and don't breathe at all.
I think the best is to just have two pairs of good quality wool or synthetic hiking socks - one pair for hiking in and one dry pair for sleeping in.
My new favorite is Teko socks. They're good quality - at least as good the better known Smartwool socks, and all the materials and manufacturing are environmentally friendly. |
|
|
|
Sleeping Setup:
We've done a lot of experimenting with our sleeping setup over time, trying to get it as weight and space efficient as possible, while still being warm. And we're still experimenting. All this is based on having two people sleeping very close together.
First we tried just bundling up in a lot of clothing with a tarp over us. This prevented hypothermia, but we could only sleep for a few hours at a time, and ended up miserable and cold.
Second, we tried keeping the tarp, but replacing the clothing with a fleece bag, to more efficiently share heat. This worked ok (we used it on our 2 month AK peninsula trek), but bugs came in under the tarp, we had to use windproof fleece to keep warm enough, and it was heavy and didn't drain water very well.
For our 2003 trek (Brooks Range - 2003) we used a sleeping bag from Big Agnes (which we can both squeeze into), plus thermarest (which slides into a pocket on the underside of the bag, and a bivy sack to which we've added a strip of fabric to make it big enough for two people. This worked ok, but created a lot of condensation, and was a tight squeeze.
For 2004 ( South Central AK ), we completely revamped our sleeping setup. We hacked the sleeping bag, and modified it to have two sleeves to hold two thermarests side by side. Alpacka rafts acted as a groundcloth. For a roof, we used a silnylon tarp, to which we sewed tie strings on the edges, and about a foot wide strip of mosquito netting along the bottom fringe. To support this structure, we use our ice axes, raft paddles, and any convenient branches or trees.
For 2005 ( Blockade Glacier )we used the same basic setup, with the minor change that we usually partially inflated the rafts we were sleeping on.
In 2006 ( Winter on the Pacific Coast ), we've started to notice some problems. The larger tarp we used for a 3-person shelter was ok, but our smaller version is very difficult to stay underneath throughout the night. The way we added ties leads to a bunching of the fabric, holding pools of water which can pour out in unfortunate places. The tarp works great set up as a tent, with a small bush as support, but when set up as a flat tarp (often necessary, especially with a small tarp), some water can squeeze through, and snow can blow in the sides. We did make a nicer sleeping bag (discarding the thermarest sleeves in favor of a simple nylon bottom - the thermarests can sit underneath). More experimenting will be needed before our trip in June 2006.
Sleeping bag
We use synthetic insulation. Down is warmer for it's weight, but can't be gotten wet. Perhaps a sleeping bag shouldn't get wet, but somehow it ends up happening... We are planning to try out a down inner bag to go inside our light synthetic bag for winter trips. Tarps
Silnylon is a silicone impregnated nylon, which is very light and waterproof. It doesn't breathe, but it makes a great tarp if you have a way to hold it up above the sleeping bag. We use paddles and ice axes. It doesn't keep bugs out on its own, but if you sew a fringe of mosquito netting around it, you can weight the netting down with random gear, and keep most bugs out. Bivy sacks
Bivy sacks are closed off, so they keep out wind and bugs much better than a tarp, without the need for the poles and stakes of a tent. They're light, and almost instantaneous to set up. Their two major downfalls are that condensation will occur inside them pretty much whatever you do, they're hard to squeeze two people into, and they get uncomfortable when it's hot out. We pretty much just use a tarp now.
|
|
|
|
Packrafts and Accessories:
See our Packrafting page for more detailed reviews and information.
The boats and paddles make up a large chunk (about 7lbs) of our total gear weight. However, rivers provide some of the biggest and most dangerous obstacles to backcountry travel. Many are simply too deep to be crossed on foot. Packrafts are also good for getting around sea cliffs, across bays and lakes, and simply for traveling down rivers, along lakes, and through fjords whenever it's convenient. Since we got our Alpacka rafts, almost every trip has become a packrafting trip.
Packrafts
Sevylor:
We spent two summers hiking with the Sevylor trail boats.
The good thing about these is that they're light (about 3lb) and cheap (about $60). The bad thing is that they're very fragile, and poorly designed in almost all ways. Take a lot of patching material, and know how to use it. Expect the bottom compartment to shred immediately. It's not worth patching. And never, under any circumstances tie anything to the tie rings on the boat. They will rip out and deflate the whole boat.
Alpacka:
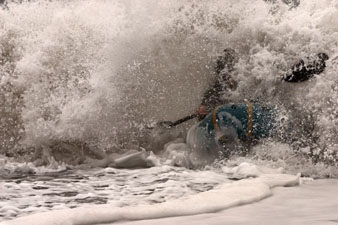
We got a couple Alpacka rafts in 2003, and they are amazing boats.
We've taken them through all sorts of water, from little creeks to the Copper River, and ocean fjords. Our only limitation seems to be our
own white water rafting skills.
They are better than the Sevylor in all ways but cost. One raft will run you about $775.
They have more air volume, a design that doesn't slosh water into the boat, tougher fabric that doesn't absorb water,
bottoms that don't shred, and rings you can pull on. They weigh about 4lb each, not including the paddle. Newer versions come with an attached spray deck, which eliminates a lot of the filling with water issues.
The red elbow valve can develop cracks if it's bent back and forth too much, so it's best to be careful of it when getting in and out of the boat. After
intensive and extensive use, the only time we've managed to get holes in these rafts is by getting swept into a chute lined
with razor-edged barnacles, and by punching a very small hole with the spines of a rockfish we caught.
Inflation bag
Sevylor boats are small enough that you can blow them up by mouth.
Some people do this with Alpackas too, but I'm lazy and lack the appropriate lung capacity.
Alpacka sells a nice and very light nylon inflation bag you can use to blow up your Alpacka raft. It only takes about 5 minutes.
The only trick is that you have to be very careful not to squash the rings that give structure to the bag when you pack it, or it won't
inflate nearly as well. Either pack it with a full stuff sack inside, or take the rings out. Paddles
We did our Alaska Peninsula trek with the plastic paddles that come with the Sevylor boats. Do not use these, whichever boat you take. From the beginning, the paddle blades would overtighten and pop loose of the shaft. They didn't fall off, but weren't at all useful for paddling until we lashed the joints with thin twine, and even then we had to be careful. Later on in the trip, both of us had a paddle shaft snap clean in half while paddling. Luckily none of these mishaps resulted un us being swept into any rapids, but I don't think the plastic paddles are safe.
The best thing to do is get kayak paddles that break down into 4 parts. Exactly which paddle comes down to a weight vs. cost issue. We have Aquabound Seafarer paddles with a carbon fiber shaft which are 200cm long (short for a kayak paddle, but long enough for a raft). These cost us about $185 each and weigh about 2lbs. We recently got the newer (and slightly lighter) Aquabound paddles, but haven't used them enough yet to comment. Paddle shafts also make wonderful walking sticks if you put something on the end to protect them. Life vests
We used to carry standard inflatable life vests, but they're heavy, bulky, and have no other use. So we using our thermarest sleeping pads. Securing them under the raincoat worked ok, but recently we've modified them with a slit in the middle (resealed), and some straps, so we can wear them as life vests. Patchkit
Make sure the glue is stored somewhere where it won't get crushed and burst open (we've made that mistake). And don't bring cheap glue. Aquaseal is good for a lot of things (particularly for repairing small holes and cracks in an elbow valve). We've never had a larger rip, but for that, it's good to carry patch material and contact cement.
|
|
|
|
Safety Gear:
-
Ice axes
The uses of an ice axe are by no means limited to stopping falls on snow slopes and cutting ice steps (though they are critical for that). In some environments, ice axes are one of the most useful things we carry. For our purposes, we like lightweight ice axes that are as long as possible.
These are great as a third leg - we hand carry them almost all the time and use them for stability in scrambling, climbing, and river crossing. They grip as well in dirt as in snow, and can be used to aid in scrambling on all sorts of terrain. They also work well as a support to tie a tarp to.
They are heavy, though. Our current thought is that ice axes are well worth it when the terrain is steep and scrambly, or you expect to encounter snow or ice (Alaska Peninsula, Kenai Peninsula). But when the terrain is mostly smooth, not brushy, and snow-free, the raft paddle walking stick is probably enough (Brooks Range).
-
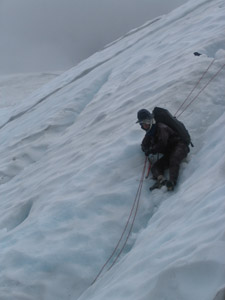
Rope
This is a piece of gear we've debated a lot. On the one hand, it's heavy, and for what we do, we almost never need it. On the other hand, when you do need it, it's fairly important. We bring 6mm rope sometimes, on trips to particularly steep areas or with more people. On our trip to the Kenai Fjords , we needed it to slide down a crevasse.
Bear deterrent pepper spray
This is designed as a last-ditch defense against a charging bear, and is carried on my shoulder strap, or somewhere else readily available. Of course, the one time I've been charged by a bear, I didn't have time to use it. See the brown bear research project site for information about pepper spray and bears. It can't be carried on an airline, so you have to either buy it at your starting point, or have it ordered to your starting point.
-
Fanny-pack kit:
We carry all our emergency gear in fanny pack or shoulder pack kits. This way it's always on us, even if we lose or are separated from our packs. We made our own mini-drybags using iron-sealable waterproof fabric to hold all the water sensitive stuff.
-
EPIRB
-
String
-
Knife
-
Bandages
-
Iodine
-
Matches
-
Lighter
-
Paraffin-soaked paper towels (firestarter)
-
Needles
-
Sturdy nylon thread
-
Emergency space blanket
Duct tape
Aquaseal and raft patching material
LED lights
Iodine tablets for water purification
Ibuprofen
-
Fishing net, line, hooks - for food emergencies in regions with plentiful fish
|
|
|
|
Assorted other gear:
Bear-resistant food bag
The Ursack is a kevlar bag designed to stop bears from getting into food. Bears are very common where we hike, though food-habituated bears are not. We store all our food in special-ordered large Ursacks (7.5oz), and choose our campsites carefully to avoid bears. So our Ursacks have never been tested by anything larger than a squirrel (it didn't get through). Some parks only allow hard canisters for bear-resistant food storage, and they're probably sturdier, but completely impractical for what we do. In the winter (obviously), we leave these at home.
-
Maps
We carry mostly 1:250,000 (quadrangle scale) topo maps, printed out on Waterproof Adventure Paper. It works better than the paint-on waterproofing. We also print out small sections at 1:63,000 that look likely to be tricky (such as mountain passes).
-
Compass
-
Cookpot
We bring a small titanium cookpot and do all our cooking on fires.
Waterbottle
Hard waterbottles are heavy. Soft waterbottles leak. So we just carry several 0.5L bottled water bottles. They're light, eay to fill, cheap, easy to pack, and redundant (in case of leaks). And they can be easily replaced in any town.
Bandanna
The only bit of cotton we carry. Good for keeping my hair out of my eyes and the sun off my head, or wiping off glasses.
-
Camera:
Over the years, we've gotten more and more into photographing our trips, and therefore our camera stuff has gotten heavier and heavier (probably 7 or 8 pounds now).
Digital SLR:
-
Canon 300D (digital rebel)
-
Waterproof carrying case
-
50mm macro lens
-
70-200L f4.0 telephoto lens
-
17-40L f4.0 wide angle lens
-
Extra batteries
-
Battery charger (for long trips)
Small camera (used to be primary camera, now either back up camera, or left at home):
General
-
Waterproof journal and pencil
-
Toothbrush and toothpaste
-
Sunglasses and Sunblock
-
Bug dope (summer)
|
|
|
|
Alaska Trekking Home | About Us | Trips | Food | Gear | Packrafts | Pebble Mine | Ground Truth Trekking
|
|
All content copyright Erin McKittrick
contact me at mckittre at gmail dot com
Last modified 4/19/06
|